Zaurus: TCP/IP over USB HowTo
Here are the steps I used to configure my Zaurus SL-5500 for TCP/IP over USB under Windows XP.
Internet Connection Sharing
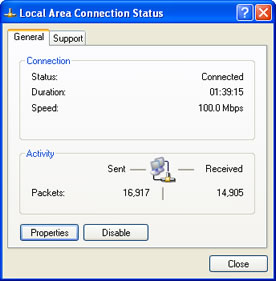
Select your Local Area Connection under the Network Connections control panel and click on the Properties button.
First you must configure your PC network connection for Internet sharing.
Select your Local Area Connection under the Network Connections control panel and click on the Properties button.
Click on the Advanced Tab, and enable the Allow other network users to connect through this computer's Internet connection check-box.
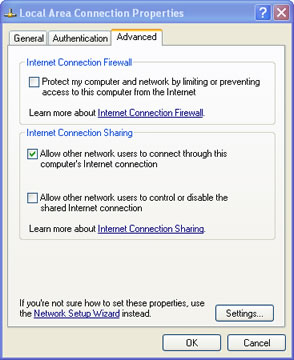
Click the OK button to save the changes.
Terminal
Here are the steps I used to configure my Zaurus SL-5500 for TCP/IP over USB under Windows XP.
Internet Connection Sharing
Select your Local Area Connection under the Network Connections control panel and click on the Properties button.
First you must configure your PC network connection for Internet sharing.
Select your Local Area Connection under the Network Connections control panel and click on the Properties button.
Click on the Advanced Tab, and enable the Allow other network users to connect through this computer's Internet connection check-box.
Click the OK button to save the changes.
Terminal
You will need to install the Terminal package on your Zaurus in order to successfully configure TCP/IP over USB. The package is also available on the Zaurus CD-ROM.
Please refer to the Qtopia or Intellisync manual for instructions on installing new packages.
Zaurus Network Configuration
Second your must configure your Zaurus network connection.
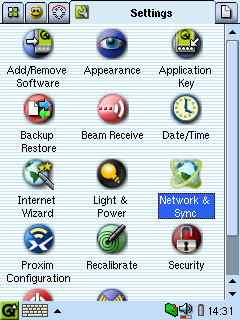
Open the Network & Sync settings application.
Select the Sync tab and set the USB IP Address to 192.168.0.100. This IP will become your Zaurus permanent address.
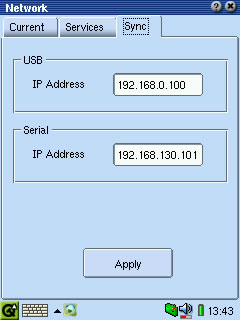
Click on the Apply button.
Select the Services tab, and Add a new (or modify your existing) USB - TCP/IP network service.

Enable the Specify TCP/IP Information check-box.

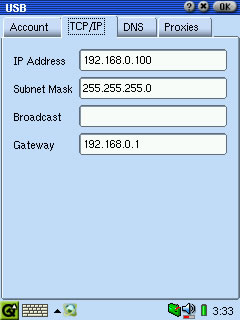
Select the TCP/IP tab when done.
Se the IP Address to 192.168.0.100, Net Mask to 255.255.255.0 and Gateway to 192.168.0.1.
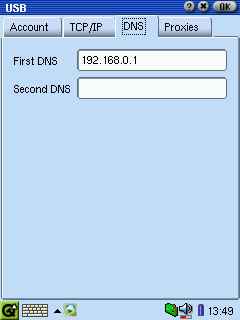
Select the DNS tab when done.
Set the Find DNS field to 192.168.0.1.
Click on the OK button at the top right corner of the screen when done.
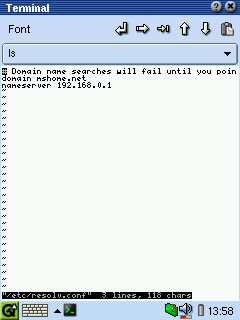
Using the Terminal, replace the content of the /etc/resolv.conf file with the following:
domain mshome.net

nameserver 192.168.0.1
Steps for vi:
vi /etc/resolv.conf

%d

i

domain mshome.net

nameserver 192.168.0.1
Hit the Cancel button located at the front of the Zaurus
shift+zshift+z
If you get lost in vi, just hit the Cancel button located at the front of the Zaurus and type:
:q!
Then try again paying close attention to the steps outlined above.
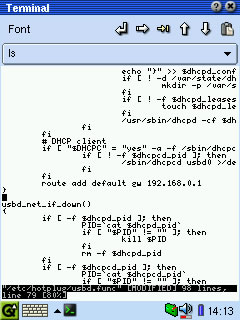
Using the terminal, add the following at the end of the usbd_net_if_up() function in /etc/hotplug/usbd.func:
route add default gw 192.168.0.1
Steps for vi:
vi /etc/hotplug/usbd.func
Scroll down the line before the closing parenthesis ("}")
o

route add default gw 192.168.0.1
Hit the Cancel button located at the front of the Zaurus then:
shift+zshift+z
If you get lost in vi, just hit the Cancel button located at the front of the Zaurus and type:
:q!
Then try again paying close attention to the steps outlined above.
Reboot
Reboot your Zaurus. You're done.
![]()
Your Zaurus will now automatically use the 192.168.0.100 IP address when docked in the cradle. Don't forget to change your Qtopia or Intellisync settings accordingly.
You will need to install the Terminal package on your Zaurus in order to successfully configure TCP/IP over USB. The package is also available on the Zaurus CD-ROM.
Please refer to the Qtopia or Intellisync manual for instructions on installing new packages.
Zaurus Network Configuration
Second your must configure your Zaurus network connection.
Open the Network & Sync settings application.
Select the Sync tab and set the USB IP Address to 192.168.0.100. This IP will become your Zaurus permanent address.
Click on the Apply button.
Select the Services tab, and Add a new (or modify your existing) USB - TCP/IP network service.
Enable the Specify TCP/IP Information check-box.
Select the TCP/IP tab when done.
Se the IP Address to 192.168.0.100, Net Mask to 255.255.255.0 and Gateway to 192.168.0.1.
Select the DNS tab when done.
Set the Find DNS field to 192.168.0.1.
Click on the OK button at the top right corner of the screen when done.
Using the Terminal, replace the content of the /etc/resolv.conf file with the following:
domain mshome.net

nameserver 192.168.0.1
Steps for vi:
vi /etc/resolv.conf

%d

i

domain mshome.net

nameserver 192.168.0.1;
Hit the Cancel button located at the front of the Zaurus
shift+zshift+z
If you get lost in vi, just hit the Cancel button located at the front of the Zaurus and type:
:q!
Then try again paying close attention to the steps outlined above.
Using the terminal, add the following at the end of the usbd_net_if_up() function in /etc/hotplug/usbd.func:
route add default gw 192.168.0.1
Steps for vi:
vi /etc/hotplug/usbd.func
Scroll down the line before the closing parenthesis ("}")
o

route add default gw 192.168.0.1
Hit the Cancel button located at the front of the Zaurus then:
shift+zshift+z
If you get lost in vi, just hit the Cancel button located at the front of the Zaurus and type:
:q!
Then try again paying close attention to the steps outlined above.
Reboot
Reboot your Zaurus. You're done.
![]()
Your Zaurus will now automatically use the 192.168.0.100 IP address when docked in the cradle. Don't forget to change your Qtopia or Intellisync settings accordingly.